

DeepSeek Janus-Professional is an open-source multimodal AI mannequin developed by DeepSeek, designed to combine visible and language processing capabilities inside a unified structure.
It employs the SigLIP-L Imaginative and prescient Encoder, enabling functionalities resembling picture era from textual content prompts and complete picture understanding.
Working it domestically ensures privateness, management, and quicker response occasions with out counting on cloud-based options.
On this information, we’ll stroll you thru the step-by-step strategy of establishing and utilizing DeepSeek Janus-Professional in your machine, masking set up, configuration, and greatest practices to maximise its potential.
What’s DeepSeek Janus-Sequence?
The DeepSeek Janus-Sequence is a group of superior multimodal AI fashions designed to course of and generate each textual and visible information seamlessly.
Every mannequin within the sequence builds upon the earlier one, introducing enhancements in effectivity, accuracy, and picture era high quality. Right here’s a breakdown of the three fashions:
1. Janus
Janus serves as the inspiration of the sequence, that includes a unified transformer structure that enables it to deal with each language and vision-based duties successfully. It employs an autoregressive framework, which means it predicts sequences step-by-step, making it well-suited for duties like picture captioning, text-based picture retrieval, and multimodal reasoning.
2. JanusFlow

JanusFlow expands on Janus by introducing flow-based rectification strategies, which improve its picture era capabilities. This leads to smoother, extra coherent visible outputs in comparison with its predecessor. The mannequin is optimized for stability and high-quality rendering, making it a robust competitor to current text-to-image fashions.
3. Janus-Professional

Probably the most superior mannequin within the sequence, Janus-Professional, is designed for high-performance multimodal AI purposes. It options:
- Expanded coaching datasets, enhancing each textual content and picture understanding.
- Optimized inference effectivity, permitting for quicker response occasions.
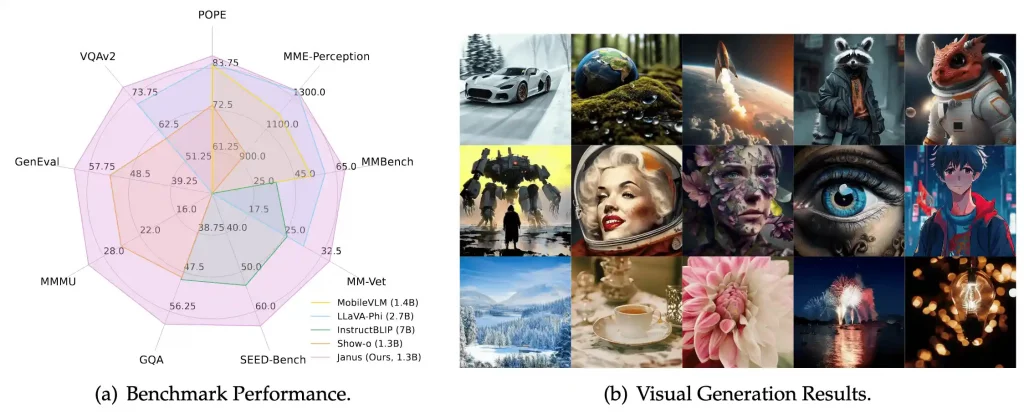
- Superior picture era, usually outperforming fashions like DALL-E 3 and Steady Diffusion in benchmark checks.
Step-by-Step Set up Information for DeepSeek Janus-Professional
1. System Necessities
Earlier than putting in, guarantee your system meets the next necessities:
{Hardware} Necessities:
- GPU: NVIDIA GPU with a minimum of 16GB VRAM (e.g., RTX 3090, RTX 4090) for clean efficiency.
- RAM: Minimal 16GB (32GB beneficial for optimum efficiency).
- Storage: No less than 20GB of free area for mannequin weights and dependencies.
- CPU: A contemporary multi-core processor (Intel i7/AMD Ryzen 7 or increased beneficial).
Software program Necessities:
- Working System: Home windows 10/11 (64-bit).
- Python: Model 3.8 or later (beneficial 3.10+).
- CUDA Toolkit: For GPU acceleration (guarantee it’s suitable together with your GPU drivers).
- Microsoft Visible C++ Construct Instruments: Wanted for compiling sure Python packages.
2. Set up Important Software program and Dependencies
Step 1: Set up Python
- Obtain Python 3.10+ from the official website.
- Throughout set up, test the field “Add Python to PATH” earlier than clicking set up.
Confirm the set up utilizing:
Step 2: Set up CUDA Toolkit (for NVIDIA GPUs)
- Obtain the CUDA Toolkit from NVIDIA’s website.
- Set up it and guarantee it matches your GPU driver model.
Step 3: Set up Microsoft Visible C++ Construct Instruments
3. Set Up Digital Surroundings
To keep away from conflicts with different Python tasks, create a digital surroundings.
– Open Command Immediate and navigate to your required undertaking listing:
– Create a digital surroundings:
– Activate the digital surroundings:
janus_envScriptsactivate
(You’ll see (janus_env) seem earlier than the command line, indicating it’s activated.)
4. Set up Required Python Packages
– Improve pip first:
pip set up --upgrade pip
Now, set up the required dependencies.
– Set up PyTorch with CUDA help (for GPU acceleration):
pip set up torch torchvision torchaudio --index-url https://obtain.pytorch.org/whl/cu118
(Substitute cu118 together with your CUDA model, e.g., cu121 for CUDA 12.1.)
– Set up the Hugging Face Transformers library:
– (Non-compulsory) Set up SentencePiece and different instruments for tokenization:
pip set up sentencepiece speed up
5. Obtain and Load DeepSeek Janus-Professional 7B Mannequin
We are going to use Hugging Face Transformers to obtain and cargo the mannequin.
– Create a Python script (e.g., download_model.py) and add the next code:
from transformers import AutoModelForCausalLM, AutoTokenizer

model_name = "deepseek-ai/Janus-Professional-7B"

# Load tokenizer and mannequin
tokenizer = AutoTokenizer.from_pretrained(model_name)
mannequin = AutoModelForCausalLM.from_pretrained(model_name)

print("Mannequin and tokenizer downloaded efficiently!")
– Run the script to obtain the mannequin:
This can robotically obtain the Janus-Professional 7B mannequin to your native machine.
6. Working DeepSeek Janus-Professional 7B Domestically
Now, let’s check the mannequin by producing a response to a immediate.
– Create one other Python script (e.g., run_janus.py) and add:
from transformers import AutoModelForCausalLM, AutoTokenizer

model_name = "deepseek-ai/Janus-Professional-7B"

# Load tokenizer and mannequin
tokenizer = AutoTokenizer.from_pretrained(model_name)
mannequin = AutoModelForCausalLM.from_pretrained(model_name)

# Enter immediate
input_text = "Describe a futuristic metropolis with AI-driven infrastructure."
inputs = tokenizer(input_text, return_tensors="pt")

# Generate response
outputs = mannequin.generate(**inputs, max_length=100)
response = tokenizer.decode(outputs[0], skip_special_tokens=True)

print("AI Response:", response)
Run the script:
The mannequin will course of the enter and generate an AI-generated response primarily based on DeepSeek Janus-Professional’s capabilities.
Instance: Enhancing Picture Descriptions with DeepSeek Janus-Professional
Now, let’s refine the caption utilizing DeepSeek Janus-Professional 7B for a extra detailed and fascinating description.
Step 1: Set up and Load Janus-Professional
Step 2: Generate an Enhanced Description
from transformers import AutoModelForCausalLM, AutoTokenizer

# Load DeepSeek Janus-Professional 7B
model_name = "deepseek-ai/Janus-Professional-7B"
tokenizer = AutoTokenizer.from_pretrained(model_name)
mannequin = AutoModelForCausalLM.from_pretrained(model_name)

# Generate an enhanced description
input_text = f"Enhance this picture description: '{caption}'. Make it extra participating and detailed."
inputs = tokenizer(input_text, return_tensors="pt")

outputs = mannequin.generate(**inputs, max_length=150)
enhanced_caption = tokenizer.decode(outputs[0], skip_special_tokens=True)

print("Enhanced Caption:", enhanced_caption)
Instance Output
Enter Picture

BLIP-Generated Caption
“A stupendous sundown over the ocean with waves crashing on the shore.”
DeepSeek Janus-Professional Enhanced Caption
The solar units in a mesmerizing mix of orange, pink, and purple hues, reflecting off the calm ocean waves as they gently kiss the golden shore. A silhouette of a distant sailboat provides a contact of journey to the serene scene.”
Optimizing Efficiency in DeepSeek Janus-Professional 7B
DeepSeek Janus-Professional 7B is a robust mannequin, however optimizing it for quicker inference, decrease reminiscence utilization, and higher response high quality can considerably enhance its usability. Beneath are key methods to attain this.
1. Dashing Up Inference with GPU Acceleration
Utilizing a GPU (NVIDIA CUDA-enabled) can drastically enhance inference pace in comparison with CPU execution.
– Allow GPU Assist (Utilizing PyTorch & CUDA)
First, guarantee PyTorch detects your GPU:
import torch
print("GPU Obtainable:", torch.cuda.is_available())
print("GPU Title:", torch.cuda.get_device_name(0) if torch.cuda.is_available() else "None")
If working on CPU, change to GPU:
machine = "cuda" if torch.cuda.is_available() else "cpu"
mannequin.to(machine)
– Use Flash Consideration for Sooner Inference
Flash Consideration optimizes reminiscence utilization for giant fashions. Set up it through:
Then, allow it when loading the mannequin:
from transformers import AutoModelForCausalLM, AutoTokenizer

model_name = "deepseek-ai/Janus-Professional-7B"
tokenizer = AutoTokenizer.from_pretrained(model_name)
mannequin = AutoModelForCausalLM.from_pretrained(model_name, torch_dtype=torch.float16, attn_implementation="flash_attention_2").to("cuda")
2. Lowering Reminiscence Consumption (Utilizing Quantization)
Quantization reduces the mannequin’s reminiscence footprint by changing weights from FP32 to INT8/4-bit precision, making it simpler to run on client GPUs.
– Set up BitsandBytes for 4-bit & 8-bit Quantization
– Load Janus-Professional with 4-bit Quantization
from transformers import AutoModelForCausalLM, AutoTokenizer, BitsAndBytesConfig

quant_config = BitsAndBytesConfig(load_in_4bit=True)
mannequin = AutoModelForCausalLM.from_pretrained(model_name, quantization_config=quant_config).to("cuda")
Advantages of Quantization:
- Reduces VRAM utilization from 30GB+ to 8GB-12GB (runs on RTX 3090/4090).
- Permits inference on mid-range GPUs like RTX 3060 (12GB).
Adjusting Parameters for Higher Response Technology
Tuning parameters can enhance response high quality, balancing between creativity, coherence, and accuracy.
1. Modify Temperature & Prime-k Sampling
- Temperature (0.2–1.0): Decrease values = extra factual responses; increased = artistic.
- Prime-k Sampling (Prime 40-100): Limits vocabulary selections to scale back randomness.
input_text = "Clarify quantum computing in easy phrases."
inputs = tokenizer(input_text, return_tensors="pt").to("cuda")

output = mannequin.generate(**inputs, max_length=300, temperature=0.7, top_k=50, top_p=0.9)
print(tokenizer.decode(output[0], skip_special_tokens=True))
For factual solutions, use decrease temperature (0.2-0.5), top_k=40
For artistic writing,g use increased temperature (0.7-1.0), top_k=100
Troubleshooting Frequent Points
Even with correct set up, customers could encounter errors associated to {hardware}, compatibility, or efficiency. Right here’s methods to repair them.
1. Set up Errors & Fixes
- Error:
pip set up deepseekfails - Repair: Use
pip set up transformers torchas an alternative
- Error:
torch.cuda.is_available() = False - Repair: Set up CUDA-compatible PyTorch model:
pip set up torch torchvision torchaudio --index-url https://obtain.pytorch.org/whl/cu118
2. Mannequin Not Loading or Working Sluggish
- Problem: Mannequin takes too lengthy to load on CPU
- Repair: Use a GPU or load the mannequin in 8-bit/4-bit mode:
quant_config = BitsAndBytesConfig(load_in_4bit=True)
mannequin = AutoModelForCausalLM.from_pretrained(model_name, quantization_config=quant_config).to("cuda")
- Problem: Out-of-memory (OOM) on low-VRAM GPUs
- Repair: Scale back sequence size & use 4-bit quantization
3. Compatibility Points with OS or {Hardware}
Error: torch: can't allocate reminiscence
Repair: Enhance swap reminiscence (Linux/macOS):
sudo fallocate -l 16G /swapfile
sudo chmod 600 /swapfile
sudo mkswap /swapfile
sudo swapon /swapfile
- Error: Mannequin fails on Home windows WSL
- Repair: Run inside native Linux or use WSL 2 with CUDA
Comparability with Different Native AI Fashions
| Function | DeepSeek Janus-Professional | Llama 3 | Mistral Massive |
| Multimodal Assist | Sure | No | No |
| Picture Technology | Sure | No | No |
| Open-Supply License | Sure (MIT) | Sure | Sure |
| Structure | t nified | Transformer-based | Transformer-based |
| Benchmark Efficiency | Outperforms DALL-E 3 and Steady Diffusion | Excessive efficiency in language duties | Excessive efficiency in language duties |
Additionally Learn: Which Is Greatest? DeepSeek vs. ChatGPT vs. Perplexity vs. Gemini
Conclusion
DeepSeek Janus-Professional provides a robust technique to run superior AI fashions domestically, optimizing efficiency via GPU acceleration, quantization, and fine-tuned parameters. Whether or not you’re constructing AI purposes or experimenting with massive language fashions, mastering these strategies enhances effectivity and scalability.
To deepen your understanding of AI and ML, Nice Studying’s Synthetic Intelligence Course gives expert-led coaching on mannequin deployment, optimization, and real-world purposes—serving to you keep forward within the AI revolution.
Additionally Learn: